In this part of the tutorial I added color to the walls, to the door and the windows. I added a brown border to the door entry and the window frame. I also made a small lamp to add to the front of the house and I felted a pot on one side of the walls of the house. I will make some roof tiles to apply to the pieces I made for the roof in my next and hopefully last part of the tutorial with needle felting. I hope to have time to make some polymer clay stuff on time for Valentine's.

I started by putting some color on the walls of the house. I chose yellow but obviously, you can chose whatever color you like.

Here I got some wool and I covered the front wall.

I started to felt and I added more wool as needed to cover weaker spots.

I did the same thing with the back wall and covered it with yellow wool.

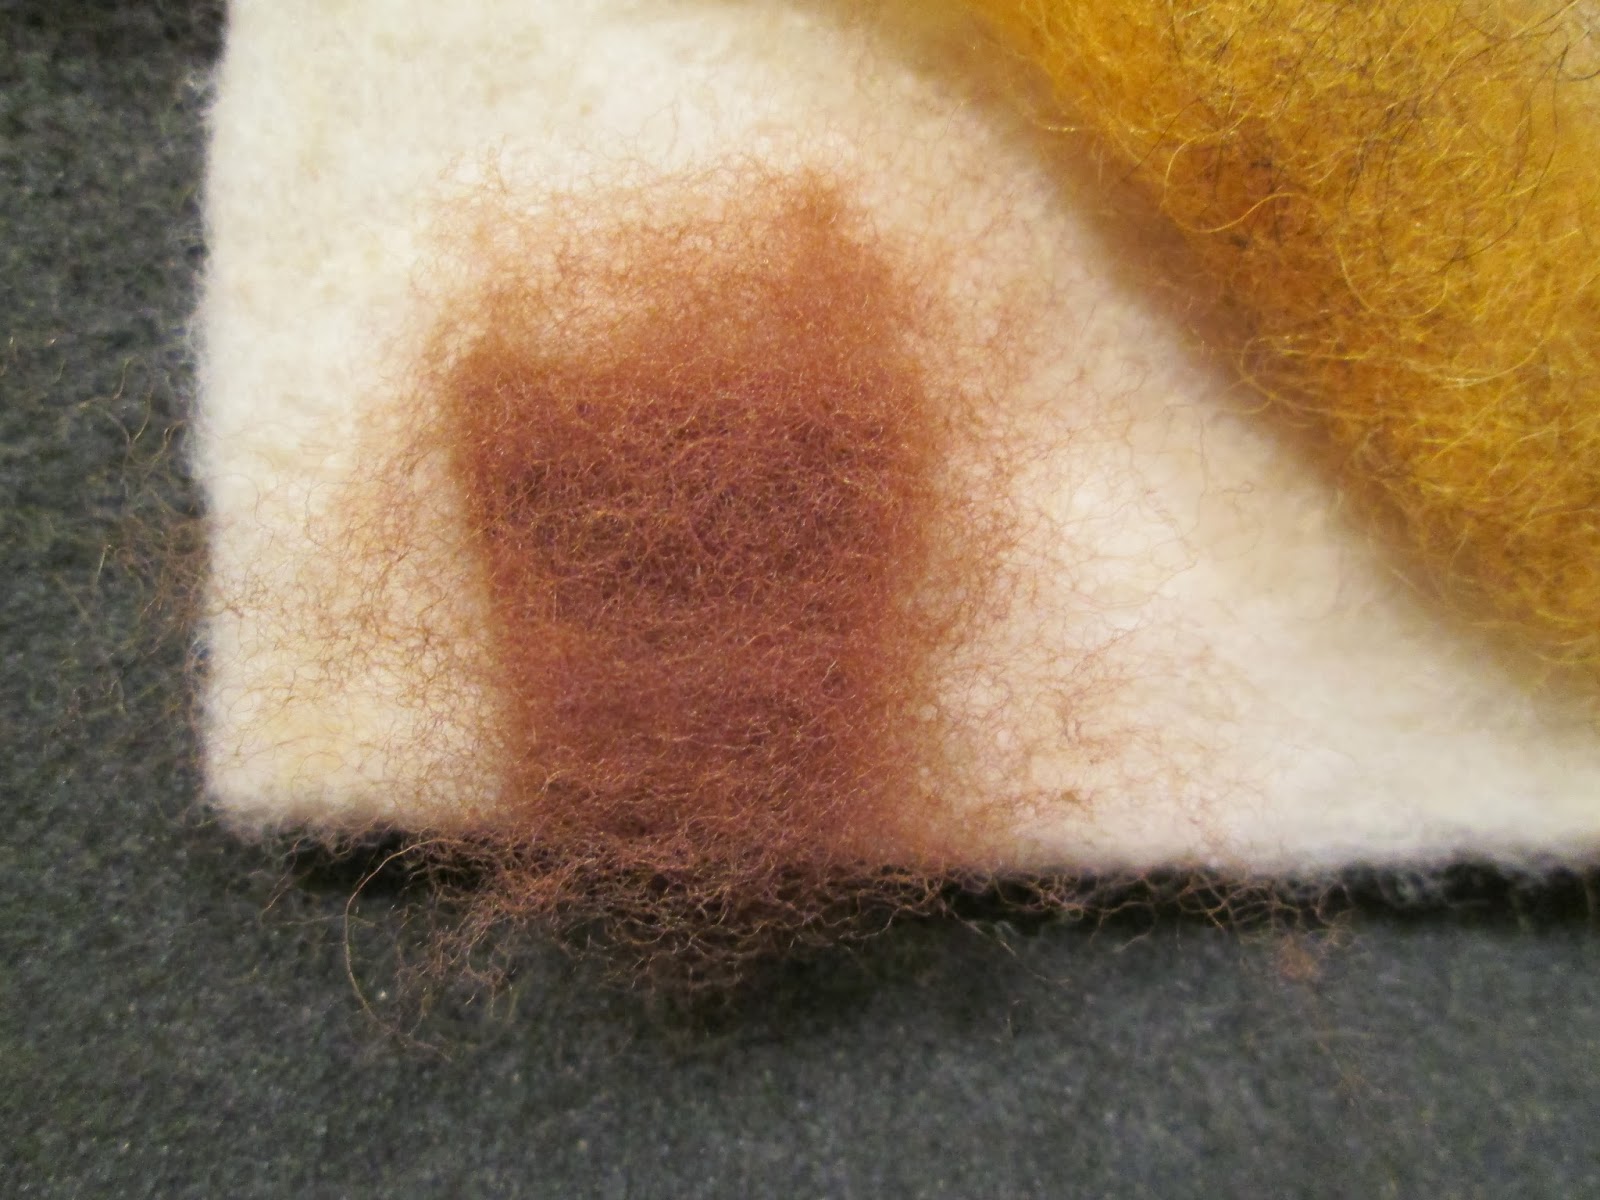
Important!!! When you attach colored wool to an already felted piece, DO NOT keep the needle straight as in this picture,

but keep it always oblique, otherwise the colored fibers will show up on the other side of the piece! The wool will felt just as well if you keep the needle obliquely.

Here I got some wool to make a brown border on the front door.

I rolled the piece,

I put it against the frame of the front door

and I attached it with pins to keep it from moving.

I started to felt the middle, inside part first.

Then I moved to felting the front border.

As I wanted a thicker border I added more wool.

I felted the wool in place

and I felted, felted and felted until the border was to my liking.

Next I got the white piece of wool I made for the door and I covered it with brown wool.

I covered and felted the piece until ready.

I did the same for the shutters and added some brown wool and felted them until ready.

To attach the shutters and the door I needed hinges, which I already made in my previous tutorial but as they came out a bit too thick I decided to make new hinges: thinner and a bit longer. On the left side you can see the hinge finished and on the right is the starting piece required to make this type of hinge.

So, I started out felting a small, rectangular piece of black wool.

I jabbed right in the middle to create a heart shape.

Then I rounded the corners of the rectangular, just by jabbing on top of them.

Once I rounded both corners, I re jabbed in the middle to highlight the heart shape.

Then I moved to the side of the "heart" and jabbed to give an indent on both the left and right side.

I continued to felt on the sides until I got a rounded shape.

Once happy with the top shape, I moved to felt the sides of the hinge.

Hinges attached on the front door. I attached the hinges by putting the hinges on top of the door and felting them in place.

Hinges attached on the back window. The top ones are shorter than the bottom ones (purposely done).

And the hinges hold perfectly!

Next, I wanted to put some decorations on the external walls, so I decided to make a pot with a climbing plant coming out of it and maybe going around the walls of the house. So I felted a small rectangular as the top of the pot.

Then I added more wool and felted the bottom of the pot. Don't worry if it doesn't look too right now! It will!
Once I had a basic shape, I added more wool to make the pot thicker.

I entered all the loose wool right under the pot...not under the white wool :)

Next, I moved to cover the window, the frame and the shelf with brown wool.

I got a wisp of wool and attached it to the middle of the window, to cover the middle section of it.

Then I got a piece of wool long enough to put it around one of the window frame.

I put the tuft of wool all around one part of the frame to see if it was long enough.

I put some pins to hold the piece in place on the front.

And on the back side of window.

Once in place, I started to felt on the inside border.

I felted all around the this side of the frame.
Once done with one side, I did the same to felt the other side of the window frame.

I put the wool on the inside of frame and I fixed it in place with pins.

I felted the frame starting from the inside part.

To felt all around the frame, I just tuck in the wool with the needle,

and I felt it in place.

As the frame was too small once felted, I added more wool to make it thicker.

Once done I cleaned all the frame by felting a bit more all around.

To cover the window shelf, I took a wisp of wool, and put it on the top of it.

I started to felt until all wool was in place.

I did the same for the bottom part of the shelf. I put some wool and felted it.

To make the shelf nice and clean, I took some cardboard and cut 2 thin pieces almost of the same measurement as the shelf.

I held the shelf between the 2 pieces of cardboard and felted all over to make the piece cleaner and more defined.

That's the back side all finished and clean.

And that's the front side, finished and clean.

I decided to add a very small window to one of the side walls....unfortunately that's how I am...I start something but I never know how this "something" is going to proceed...I might do something, then change it and then change it again if I don't like it. And I keep adding things which make my work NEVER ENDING!!! :) :)

I got a pair of scissors and cut all around to make a small, square opening.

I just imagined a small square and cut around it.

Then I added a brown border as I did for the bigger windows.

I always start felting on the inside, to keep the piece of wool in place.

Once I felted the inside of the small window, I added more wool to make the frame larger.

I felted the first 2 sides of the frame.

And then the other 2 sides.

And this is the small window finished. I just need to make a very small shutter to attach on the inside of the window.

Next I put some green, some plants on the pot. I took a wisp of wool,

attached the bottom to the pot and I twisted the wisp of wool between my fingers.

After twisting the wool, I felted it in place with the needle.

I added more twisted, wisps of wool to make the plant bigger and fuller and felted these "branches" into place.

Starting from the bottom, I felted all the way up to the top of the branch.

I also put some branches on the side of the wall with the window. I wanted a climbing plant that it goes from the wall with the pot, to the next wall with the window.

I also took some wisps of wool, rolled them into spikes between my hands, attached some leaves and then felted the branch into place, on the wall of the house.

To make branches with leaves, I took a wisp of wool and rolled it between my hands. With a pair of scissor I cut the leaves shapes from a felted sheet and then I felted them on to the rolled wisps of wool.

Here I am attaching one leaf to the branch.

And this is the branch finished that I can now attach in any place on one of the wall.

Once I made a few branches, I attached them to the wall, on top of the window and on the sides.

This is the plant and a side view.

This is the side with the window and open shutters. The shutters open and close as the front door.

A corner view of the house momentarily closed with pins. I will not felt the house closed in place until I make all decorations on the inside walls. This piece of branch, not felted, will be done when I will felt close the house.

A top view of the inside with open shutters.

A front view with the lantern I made.

Front view with open door.

Corner view with open door.

Other corner view.

Final corner view. As said above, I will felt in place this branch not felted when I will be ready to felt close the house. Next step will be the roof. I will felt many roof tiles to attach to the 2 pieces that I have already felted for the roof.
Bye bye everybody!!!!
No surprise you didn't have time for other blogs... you've been very busy. So much progress - I can't believe you've even felted the hinges... A very unique little house.
ReplyDeleteGreetings
Birgit
Yes Birgit...very busy!! It has became a full time job...honestly!! Thanks for stopping by!
DeleteHi Simona,
ReplyDeleteI'm with Birgit, no wonder you haven't had much time! That's a lot of work and then there is the work of taking the pictures and posting everything to your blog with instructions and everything. Very impresive. Now I need to add felting to the list of things I want to learn how to do! So glad I found your blog.
Susan
:) You are both right Susan!! You should try felting. It doesn't cost much, actually very little and the tools you need are just....a needle and wool!! :) It is a lot of work because it takes time to felt but it's very rewarding. Thanks for following me...I'm following you back! Hugs!
DeleteYou make beautiful felt work and dn delicate decoration. My hat off to your gorgeous creation.
ReplyDeleteThank you so much Terri for the lovely comment!! I love your stuff too!!
DeleteHi Simona. Thank you for all the pictures and descriptions of the technique for felting. It is an interesting craft that has gained a lot of followers in recent years. I do have it on my "would love to learn list".
ReplyDeleteAll the best
Janine
Hi Janine, you are very welcome. I hope you'll give it a try as it is a pretty easy craft and I also hope you can find some help from my tutorials! Take care!
DeleteIt looks so wonderful and you make it look so easy. I'm excited to see the finished result.
ReplyDeleteEnjoy
Hugs
Wyrna
:) Thanks so much Wyrna for your compliment!! :) I hope to finish it soon so you can see it completed. Hugs back at you!
DeleteYour house is amazing. Wow fantastic work. Needle felting is something I haven't tried yet. Its on my to try list lol. I love your house and am looking forward to seeing more. Thanks for sharing.
ReplyDeleteHugs Maria
Hi Maria!! I'm glad you like it and as for everybody else I do hope you try it. I'm always happy to share so I'll do my best to share more and more! Big hugs!!
DeleteLove, love, love...so cunning! I especially like the hinges and the lantern/hanging lamp! Utterly adorbs!
ReplyDeleteThanks for stopping by Heather!!. I always love your work and I'm always looking forward to see more!!!
DeleteOMG....I Love this House already! I Love felting also...would really like to try to make a little cottage myself one day if you don't mind!? Thanks for this inspiration!
ReplyDeleteBig Hugs
Kikka
Hi Kikka! Thanks for following me! Of course you can try to make a cottage....it would be crazy from me to put a tutorial up on my blog and then get angry because people make one! :) :) If you should ever make one, please show it around, I would be very happy to see your version! Big hugs back at you!
DeleteQué bonita te está quedando, las ventanas, la maceta, el farol... Preciosa! Un abrazo
ReplyDeleteThank you Esther!!! I love your comments!! Kisses!!
DeleteWow this looks really cute! Felting looks really complicated to me, but the result is fabulous. I look forward to see the finished house. Thank you so much for your comment, I am glad that you liked it. Hugs, Ebru
ReplyDeleteHi Ebru! I am happy you like it!! Felting it's not complicated. You should give it a try and judge for yourself. I love your work and I will be happy to comment again and again!! Hugs!
DeleteThe house is looking amazing!! I love love the vine on the side, and the hinges on the door are just awesome! This is really cool Simona!
ReplyDeleteHey Jane!! Thank you so much for commenting, for stopping by and for liking my little house...You know how much I like your stuff....so for you to say you like mine, it means a lot!!! Thanks for stopping by!
DeleteSimona, thank you for your fabulous and very detailed tutorial. You make it look so easy. I would love to try felting one day, already bought a needle! It is a start, true? Mini hugs, Natalia
ReplyDeleteYou are very welcome Natalia!! I think it looks easy because it probably is easy! :) :) Yes!!!! Once you have a needle for felting, you are halfway there!! You just need some wool now and you are ready to go!! If you have any questions, just ask me, I'll be happy to help! Mini hugs back at you!! :)
DeleteThis technique is so interesting! The house is getting gorgeous!
ReplyDeleteThanks for sharing the tutorial.
Hugs.
Thanks Eliana!!! I am so happy you like it!!! Thanks a million for stopping by! Big hugs!
DeleteThis is an original project. I like the result.
ReplyDeleteGreetings, Faby
Mi fa piacere che ti piace Fabiola e grazie per il commento!
DeleteWhat a darling project! I enjoy watching your process too. This would be the perfect house for some woolly critters--too cute! xo Jennifer
ReplyDeleteHi Jennifer!!! I am so happy you like my little house. I love your critters and their stories and I am always glad to come and read some of their stories!! xxoo
DeleteHi Simona! WOOOW, what a fantastic work, no wonder you haven't had no time for other things ;)! You've put a lot of work in your excellent and clear tutorial, I've learned a lot from you. I said some time ago that I will ever will learn needle felting. With these tips I think I will give it a try :D! This house looks like a fairy tale house, it is so well done, thank you for sharing!
ReplyDeleteHave a great week. Hugs, Ilona
Hi Ilona!!!! :) WoW!! Thanks for your sweet comment!!! This made my day!!! I am so happy that people can try needle felting with my help and that people feel inspired by my work. You absolutely need to try and I would be so glad to see your version of it. If you should ever need any help, just ask me and I will be happy to help you. Have a nice week you too and I will send big hugs your way!
DeleteHi Simona! I have to say that I had my first introduction to needle felting June 2012, and purchased 2 tiny critters, a jointed teddy bear and a felted kitten and I love them! I am impressed by the skill required for this hobby and although I don't think that I would do it myself, I am mesmerized by the abilities of others to make adorable objects, such as your little yellow house, all from felt! Keep up the great work, Simona, I love what you are doing!
ReplyDeleteelizabeth
Hi Elizabeth!! Thank you so much for your lovely comment! I am so happy that you like my little house and seen that you have tried it in the past, you surely know how long it takes!! :) But, I have to say, I do love the softness of the wool and I am glad to work with it. Big hugs and thanks again for your kind words!
DeleteVery cool! I love the way you made the doors and windows openable < is that a word :D It is, I just looked it up :D Lovely to see a detailed progression of it too.
ReplyDeleteBefore I got into dollshouse stuff I had a go at needlefelting, love the process, hate the jabbed fingers :D I know this craft takes a looooooooooooooong time to do. There is a russian man, Vriad Lee that makes little animals and he uses a few needles held together with yarn, I used an elastic band for my bunch of needles, and it does speed up the groundwork. Another thing I learned from his website, was using cheap cushion stuffing filler for the interior, to save your good wool for the exterior. Hope you don't mind me telling you all that :D
P.s. Greetings from the north of Ireland :)
Hi Sarah! Thanks for following me! I found your blog some time ago and I love your tutorials! I don't mind at all when people say or suggest things to me!! That's another way of learning and I could never be angry!! I actually do have needle handles to hold from 4 to 10 needles, but seen that not everybody might have them, I preferred to show the tutorial only with one needle. I also use core wool and save the colored, good one for the outside. The kind of white wool you see in my tutorials it's a core wool that costs less compared to the finer wool but again I do appreciate your advice because if I didn't know about using more needles or a different type of wool, it would have come in very handy!!
DeleteThanks a million for stopping by Sarah and commenting!! Big Irish hugs!! :)
Hi simona, me again :D Blogger has its ups and downs, if I reply to your comment on my blog, you won't be notified, unless you subscribe to a follow up email, which then spams your inbox, anytime anybody comments on that post. Also I added your blog from Minworks blog, because your blog didnt show up on my dashboard beside your name, but when I went to minworks to leave a comment I saw your profile pic just above my comment, clicked on it, and there was your blog name!! There are quite a few people I have tried to follow from my dashboard follower list, and their blog won't show, and recently some blogs won't accept my comments either! Welcome to blogspot! :D
ReplyDeleteHi again Sarah! I have to say that Blogger has a new problem everyday!! The same thing happens to me....I always try to follow the people that are following me but it's not always easy to find their blogs from just their picture or their Blogger account!! Thanks for answering my comment on your blog in here. I do appreciate that and I thank you for that!! By the way....I love your cute miniatures and your tutorials!!! Big hugs!!
DeleteWow! Fantastic work! I'm glad I found your blog now =)
ReplyDeleteHannah
Hey Hannah!! Thanks a million for your comment, you are very kind! I'm a follower too of your blog and I'm looking forward to see more from you. I remember I asked days ago to yours comments but for some reason, they are all gone!! Thanks again for following me! :)
DeleteUn trabajo precioso y detallado el que estás haciendo,me encanta,va a quedar genial!!!!
ReplyDeleteBesos.
Thanks you so much Pilar!! I am very glad you like my work. I love the wisteria you made. Perfect! Thanks also for being a follower. Hugs :)
DeleteCreo que se puece aprender mucho en tu blog,con tu permiso aquí me quedo.Bss apretaos!!!
ReplyDeleteHi Cristall!!! Thanks for following me!! I love your blog and the things you make!! Kisses back at you!
DeleteHello! We have just found your blog and we´ve liked it very much! We follow you! :D Hope you like our blog too :)
ReplyDeleteWe send you a very big hug!
www.melodiasporescrito.com
Thanks for following!! I'm following you back.
DeleteWow. Your work is incredible! What a fabulous tutorial. Found your blog through your comment on Mitchy Moo Miniatures. Looking forward to following your blog. :D
ReplyDeleteHello and welcome!! I've been a follower of yours for quite some time now. I love all your new miniatures!!! Thanks a million for following. Big hug!! :)
DeleteGood job!!! Love your blog! Following it
ReplyDeleteHi Laura!! Thanks a million for following me and for liking my blog....there is not much at the moment but I've only started in Dec, so I hope to add more stuff in the near future! I'm following you back, by the way! :)
DeleteGoodness!!! This is SO amazing Simona! :) All the details you were able to get in there with just needle felting is so... amazing!!!
ReplyDeleteHi Lindsey! Thank you so much for your nice comment!! I have to say that it wasn't too easy to felt such small things but somehow....I did it!! :)
DeleteWonderful tutorial. I have never try to felt but I should attempt...I am sure that i will love it :)
ReplyDeleteHi Eva! Nice to see you here! Thanks for liking my tutorial!! You should really attempt that because wool is very forgiving and everybody could work with it!! :)
DeleteSimona, it is wonderful! Really i liked it so much. Is that white felt is prefelt? u did with needle felting or it is already prepared like that?
ReplyDeleteI was thinking make a house decor for my needle felted dolls,so your tutorial will be good reference for me ;) Great work!
Hi!! No, there is no prefelt in my work. If you have a look at the tutorial Part 1, you can see how I made the walls. Thanks for stopping by!!
Delete