*********************
Ero insicura su che tipo di casa fare: casa di pan di zenzero o casa delle fatine e devo dire che non ho ancora deciso. Quindi intanto inzio a fare i muri e il tetto della casa e poi decidero'.
Ho iniziato a feltrare i pezzi con della lana che uso per fare le basi di tutti gli oggetti che faccio e poi la ricopriro' con lana Merino o Norvegese.

Materials that I used:
Core wool (6gr front wall, 6gr back wall, 6 gr each for left and right wall, 5gr each for left and right roof)
Multineedle Pen,
Spiral Needle 40 Gauge
Star needle 38 Gauge
Double star needle 38
Foam pad
Empty box of cereal (to cut out shapes)
Lots of patience
You don't need to have many types of needles. You can do all with a normal, triangular 36 or 38 gauge needle and you can finish off with a finer needle like a 40 or 42 gauge.
First of all I drew the house on a piece of paper just to decide how big I wanted it and to get the exact measurements in cm of each wall, the front and back of the house and the roof. I will need to felt 2 pieces each of wall, roof and house front and back.
First of all I drew the house on a piece of paper just to decide how big I wanted it and to get the exact measurements in cm of each wall, the front and back of the house and the roof. I will need to felt 2 pieces each of wall, roof and house front and back.
*********************
Prima di tutto ho disegnato la casa su un pezzo di carta per decidere quanto doveva essere grande e per prendere le misure esatte in cm per i 2 muri laterali, il davanti e dietro della casa e il tetto.
Per fare i muri ho tagliato una forma rettangolare, della misura desiderata, da una scatola di cereali.

I started making a rectangular shape with a cereal box to do the walls. I filled the carton shape with wool and I put some pins to hold the shape in place, at least for the first few jabs to get the right shape.
*********************
Ho riempito la forma in cartone con la lana ed ho messo degli spilli sui lati per mantenere la forma al proprio posto almeno per i primi colpetti per ottenere una forma approsimativa.
*********************
Ho riempito la forma in cartone con la lana ed ho messo degli spilli sui lati per mantenere la forma al proprio posto almeno per i primi colpetti per ottenere una forma approsimativa.

Then I started to jab, jab, jab and I jabbed, jabbed, jabbed a little more!
Once the wool started to compress, I removed the felted piece and turned it upside down and I felted a bit more.
*********************
Poi ho iniziato a dare dei colpi rapidi con l'ago e ancora e ancora e ancora!!! Una volta che la lana inizia a comprimersi, ho tolto il pezzo, l'ho girato dall'altro lato ed ho continuato a colpire e colpire e colpire con l'ago.
*********************
Poi ho iniziato a dare dei colpi rapidi con l'ago e ancora e ancora e ancora!!! Una volta che la lana inizia a comprimersi, ho tolto il pezzo, l'ho girato dall'altro lato ed ho continuato a colpire e colpire e colpire con l'ago.

It's important to felt on all the 4 sides to get a nice defined shape and I do this by putting the needle (or needles) against the side of the carton shape and felt up and down all along the sides. I also hold the carton shape in place while doing this. As the carton is not very hard, if I don't keep it in place it might move and I might not get a proper rectangular shape.
Because I'm building walls, I need them to be very very hard, so that they can withstand the weight of the roof and still stay straight. So it's important to felt properly putting the time needed.
*********************
Ricordate di feltrare su tutti e 4 i lati per ottenere una forma rettangolare ben definita. Per fare questo, mettete l'ago (o gli aghi) sul lato interno del quadrato di cartone e colpite su e giu' lungo i lati. Quando fate questo vi consiglio di tenere il quadrato di cartone per evitare che perda la sua forma.
Siccome sto costruendo dei muri di una casa, mi servono super resistenti, che possano supportare il peso del tetto rimandendo in posizione. Quindi e' importante in questi passi, che la lana sia feltrata al massimo.

Every now and then, I flip over the piece of wool so that it doesn't stick to the felt pad. Also, when I take it out of the carton shape, I touch it to see if there are any spots that are weaker and that might need more wool attached to them and also to feel if the piece is strong enough.
*********************
Ogni tot tempo girate il pezzo che state feltrando in modo che non si attacchi alla base di spugna (o schiuma) e toccatelo per rendervi conto se alcune parti sono piu' deboli ed hanno bisogno di piu' lana e quanto il pezzo e' resistente.
*********************
Ogni tot tempo girate il pezzo che state feltrando in modo che non si attacchi alla base di spugna (o schiuma) e toccatelo per rendervi conto se alcune parti sono piu' deboli ed hanno bisogno di piu' lana e quanto il pezzo e' resistente.

You can also keep the piece against the light to see all the weaker spots that need more wool.
*********************
Potete anche tenere il pezzo attraverso una fonte di luce per vedere i punti che hanno bisogno di piu' lana.
*********************
Potete anche tenere il pezzo attraverso una fonte di luce per vedere i punti che hanno bisogno di piu' lana.

My piece needed more wool, so I just attached it over and felt more.
*********************
Se il pezzo ha bisogno di lana, aggiungetela e continuate a feltrare.
*********************
Se il pezzo ha bisogno di lana, aggiungetela e continuate a feltrare.

Once I feel the piece has been felted enough (it's never enough for me and I go on for ages!!!) I moved to felt and finish the sides. I do this by putting the piece on my felting mat and felt side ways. I then use a multineedle tool or single needle tool to felt the sides.
*********************
Quando il pezzo e' stato feltrato abbastanza (non e' mai abbastanza per me e di solito continuo per ore e ore) potete concentrarvi a rifinire i lati. Potete fare questo con uno strumento con piu' aghi o solo con un ago.
*********************
Quando il pezzo e' stato feltrato abbastanza (non e' mai abbastanza per me e di solito continuo per ore e ore) potete concentrarvi a rifinire i lati. Potete fare questo con uno strumento con piu' aghi o solo con un ago.

There also is another way of getting the sides, corners very clean, and this is by putting the piece of wool between 2 cards (credit cards type of thing) or 2 pieces of hard carton. I'll post a picture of this next time I find myself using this method.
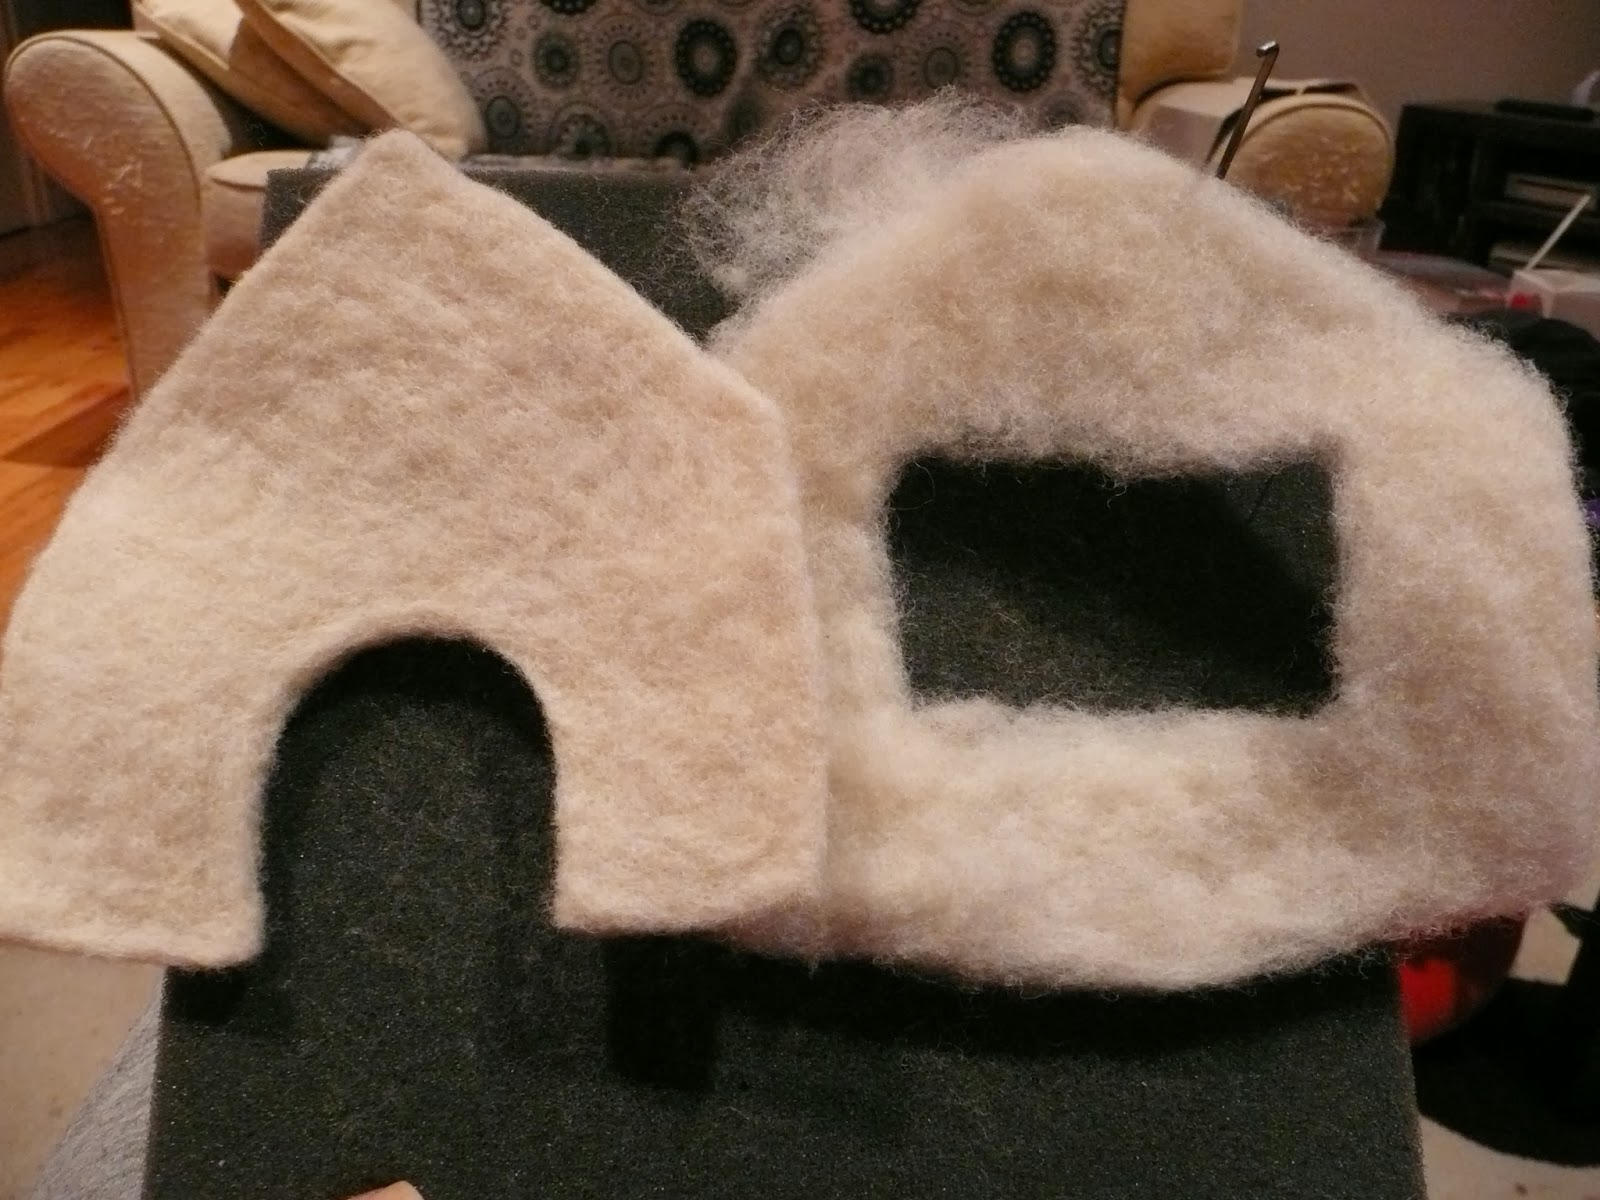
Below, you can see on the right, one of the walls already felted to finish (almost) and on the left is the other wall that needs to be finished.
*********************
C'e' un altro metodo per rifinire i lati e gli angoli usando 2 carte tipo di credito o 2 pezzi di cartone non troppo morbido. Pubblichero' una foto su questo metodo la prossima volta che lo usero'.
Sotto, potete vedere sulla destra uno dei 2 muri gia' quasi finito e sulla sinistra l'altro muro che deve ancora essere finito.

Because I am making walls for a house, then they need to be as strong as possible and also pretty thick. The thickest, the harder, the harder the better chance of the house holding the weight of everything else.
After the walls were finished, I moved to make the front and the back of the house. To do this, I did the same as for the walls and made a shape out of carton. This is only to give me the initial shape.
*********************
Se fate i muri per una casa allora devono essere resistenti e spessi. Piu' sono spessi, piu' sono duri, piu' resistenti saranno e piu' possibilita' ci saranno che la vostra casa restera' in piedi e sara' in grado di sostenere il peso del tetto.
Dopo aver finito i muri, ho iniziato a fare il davanti e dietro della casa. Per fare questi, ho usato lo stesso metodo per fare i muri ed ho ritagliato la forma da una scatola di cereali. La forma di cartone mi serve solo per ottenere una forma approsimativa iniziale.

I cut a slice from a toilet roll tube to make the door, cut this slice at the bottom and attached the little flaps to the bottom of the house shape with sellotape.
*********************
Ho tagliato una striscia da un rotolo di carta igienica per fare la porta ed ho tagliato questa stricia nella parte inferiore e ho attaccato le piccole alette alla forma fatta in cartone per il davanti della casa.
*********************
Ho tagliato una striscia da un rotolo di carta igienica per fare la porta ed ho tagliato questa stricia nella parte inferiore e ho attaccato le piccole alette alla forma fatta in cartone per il davanti della casa.

I filled the shape with wool and started jabbing to get an approximate shape.
*********************
Ho riempito questa forma in cartone con la lana ed ho iniziato a colpire per ottenere una forma approssimativa.
*********************
Ho riempito questa forma in cartone con la lana ed ho iniziato a colpire per ottenere una forma approssimativa.

Once I got the shape I wanted and I felted for a bit, I took the wool piece out of the carton shape and started to give it an even more defined shape.
*********************
Una volta che ho ottenuto la forma che voglio, ho uscito il pezzo di lana dal cartone e ho iniziato a dargli una forma ancora piu' definita.
*********************
Una volta che ho ottenuto la forma che voglio, ho uscito il pezzo di lana dal cartone e ho iniziato a dargli una forma ancora piu' definita.

As I did for the 2 walls, I felted all over the sides of the front wall to make it clean and I started felting to make the piece hard, strong and well felted.
*********************
Cosi' come ho fatto per i 2 muri, ho rifinito tutti i lati e ho continuato a feltrare per rendere il pezzo piu' resistente e piu' duro.
*********************
Cosi' come ho fatto per i 2 muri, ho rifinito tutti i lati e ho continuato a feltrare per rendere il pezzo piu' resistente e piu' duro.

When I finished felting the front, I moved to do the back of house. I wanted to put a window on the back wall, so I cut another small, rectangular shape out of carton and I put it on the inside of the front shape I already used to felt the front of the house.
*********************

I filled the carton with wool, felted a bit to get an approximate shape and took it out to felt it properly.
*********************

I needed to clean up the shape like the one I did previously
*********************

Once finished with the back wall of the house, I cut another shape out of carton, this time to make the roof. I am going to need 2 pieces for the roof. I filled the carton shape with wool and started to felt.
*********************

Once I got the desired shape, I took it the piece out of the carton shape a few times to switch sides and felt on both top and bottom. Once done I took the piece out of the carton to felt it properly.
*********************

Seen that I have all the other pieces ready, I am going to put them together with pins so that I can check if the roof is of the right shape and size and how many cm I still have to felt the sides of the roof without the fear of the piece getting too small.
*********************

And here is the first piece of the roof, not yet all felted, on the top of the house from a top view:
*********************

Front view:
*********************

Back view:
*********************

With the measurements checked and fine, I felted the other side of the roof, using the same piece of carton I used for the piece of roof I just made.
So now I have all 6 pieces of my house ready.
*********************

I know, the back wall of the house looks smaller....but, trust me.....it's not! :)
With the pieces ready, I put them together with pins to have a look at the finished house.
*********************


*********************

I filled the carton with wool, felted a bit to get an approximate shape and took it out to felt it properly.
*********************

I needed to clean up the shape like the one I did previously
*********************
Once finished with the back wall of the house, I cut another shape out of carton, this time to make the roof. I am going to need 2 pieces for the roof. I filled the carton shape with wool and started to felt.
*********************

Once I got the desired shape, I took it the piece out of the carton shape a few times to switch sides and felt on both top and bottom. Once done I took the piece out of the carton to felt it properly.
*********************

Seen that I have all the other pieces ready, I am going to put them together with pins so that I can check if the roof is of the right shape and size and how many cm I still have to felt the sides of the roof without the fear of the piece getting too small.
*********************

And here is the first piece of the roof, not yet all felted, on the top of the house from a top view:
*********************

*********************

*********************

With the measurements checked and fine, I felted the other side of the roof, using the same piece of carton I used for the piece of roof I just made.
So now I have all 6 pieces of my house ready.
*********************

I know, the back wall of the house looks smaller....but, trust me.....it's not! :)
With the pieces ready, I put them together with pins to have a look at the finished house.
*********************

Well, it's not finished, not even close, but the foundations are ready. I still need to do the door, to attach shutters, a small balcony and probably a chimney. An outside garden, maybe with a tree and some clothing left to dry and then there is the inside furniture.... Before I attach the pieces together and cover it with some colorful wool, I want to do and put some decorations on the inside walls and it would be easier for me to do it now that I can move and handle the walls as I like than when the walls will be attached together and limit my movements with it.
I'm going to head off to make those 6 pieces of walls and roof much stronger....When I said that for me was never "enough" that's what I meant.... : ) : )
I'll will post more as I go along with this project. If you have any questions don't be shy and just ask me and I will be happy to answer them.
*********************
Can't wait to see more, Simona! Love your blog and am now a follower. Thanks for following my blog, and putting my little contest on your blog.
ReplyDeleteLisa :-)
Hi Lisa! You are very welcome!! I absolutely love what you are giving away and in general I love your work! Thank you for following my just started blog. I hope you will find things that you like. You don't show up in my followers....Yesterday no followers were showing up on my blog, today it's just you....I hope they fix it!! Thanks again for the support (comment and following). Big hug!
DeleteWhat a great idea to needle felt a house! I've never seen this before! I can't wait to see more!
ReplyDeleteI am a new follower of your blog.
Kind regards, Ilona
www.MiniMumLoon.blogpsot.com
Hi Ilona! Thanks so much for following!! Yes, I've never seen a house built with wool, needle felting it. I mean, there are mushroom, fairy, gnome houses around but even then, not much on how to make them. There are a lot of dolls around but all these dolls need housing!!!! : ) :) I've just followed you back (love your last dress). Thanks again!
DeleteLooks very interesting! Felting is on my list to learn! Merry Christmas! Mini hugs, Natalia
ReplyDeleteHi Natalia. You are going to love needle felting!! Wool it's a very forgiving material and very easy to work with. I'll be publishing more and more tutorial, also on how to finish the house that I've just started. Thanks for you comment and Merry Christmas to you too!! Love, Simona
DeleteYou're very creative and very detailed steps of making. Good referene. Merry Christmas and Happy New Year !
ReplyDeleteHi Terriea! Thank you so much for your nice comment. I love the scarves you do!! Merry Christmas to you and your family and Happy New Year! :)
DeleteHola Simona, pensé que te seguía en tu blog, y no era así, lo siento. Es muy curioso lo que haces yo no conocía este tipo de trabajo, me gusta. Un abrazo y te visitaré asiduamente.
ReplyDeleteHello!!! It's so nice to see you here!! :) I love your things and I'm happy I found your blog!!! A big hug to you too and I'll see your around blogging. :)
ReplyDeleteIt's a good tutorial, I would like to see more!! Thank you very much for your lovely comment, my best wishes for the new year!! Hugs
ReplyDeleteThank you so much Paky!! The house it's not finished yet so I will be posting more tutorials. Thanks again for your nice new year wishes and I hope the same to you! Hugs and kissed back at you!!
DeleteThis is great! Thanks for sharing!! I love needlefelting, but I'm still a amateur and glad to see others techniques =)
ReplyDeleteHannah
Thank you Hannah! I love to share needle felting works because there is not much on the web about needle felting at least, not many detailed tutorials and as you said, it's always nice to see other people's techniques. <3
ReplyDeleteHello. Did you complete your cottage?
ReplyDelete